To facilitate the Power Embedded installation process, we have created this tutorial to help our customers install Power Embedded.
Prerequisites for performing the installation
As Power Embedded is a SaaS system, you will not need to guy or manage any server, application or database, you will just use the software as a service.
To set up Power Embedded in your company, we need the following prerequisites to be met before we can schedule the installation:
- An Azure user account with permission to create Fabric or Embedded capacity.
- Conta de um usuário do Azure com permissão para criar grupos e aplicativos no Azure AD.
- Account of an Azure user who has the “Fabric administrator” role to access the Power BI admin portal.
During the system installation meeting, which is held together with the client, we need to have a user with the permissions listed above, or someone from the customer's team with these permissions, someone that can share the screen and perform the required tasks that will be instructed.
Como criar o usuário do Power Embedded no Azure AD
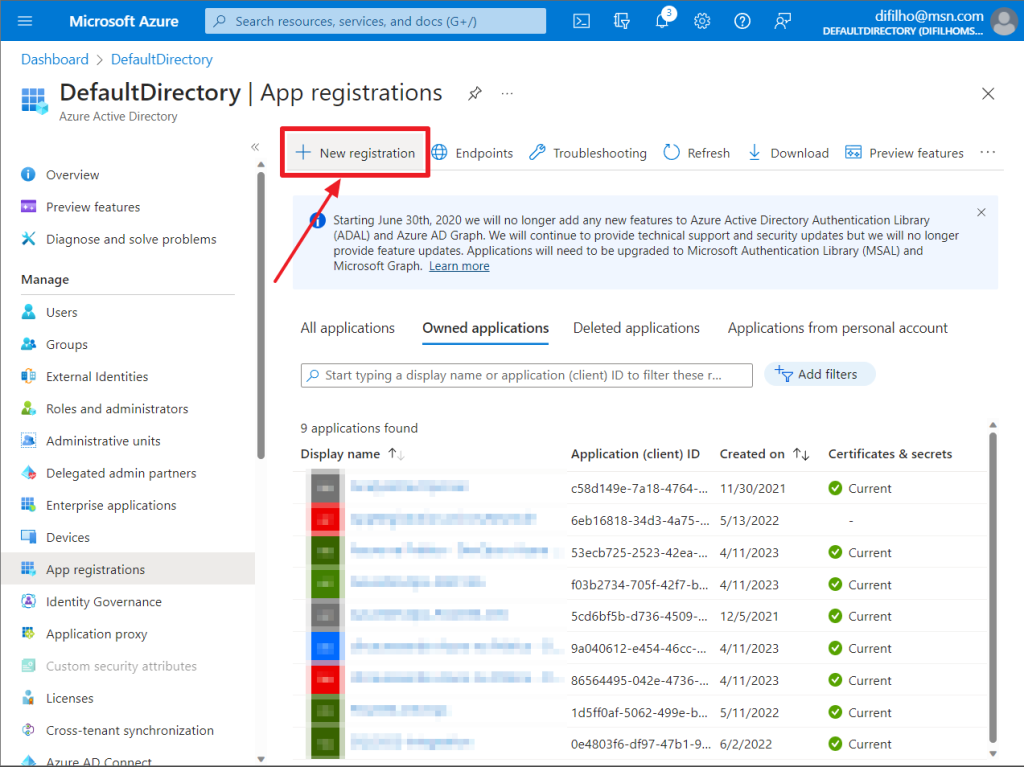
Para criar o aplicativo que será utilizado pelo Power Embedded, você precisará acessar this link here.
On the screen below, click on the “New registration” button
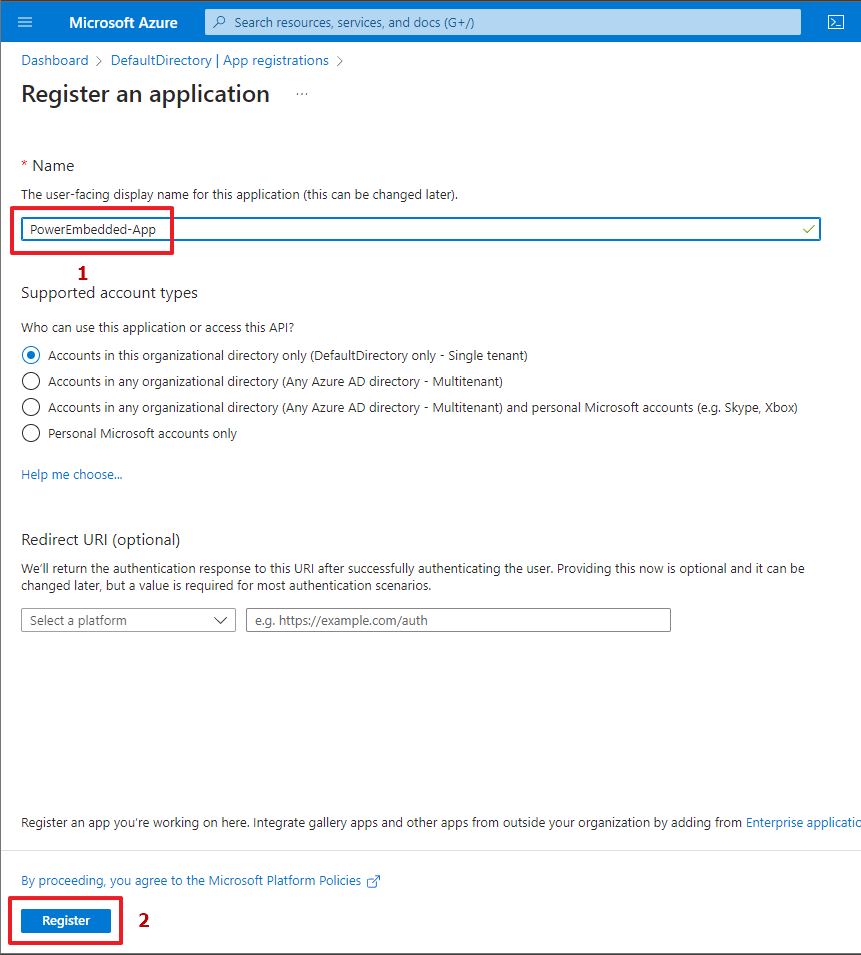
Now you will need to choose a name for the application that you will create in your Azure AD. The name is up to you.
After that, click on the “Register” button at the end of the page.
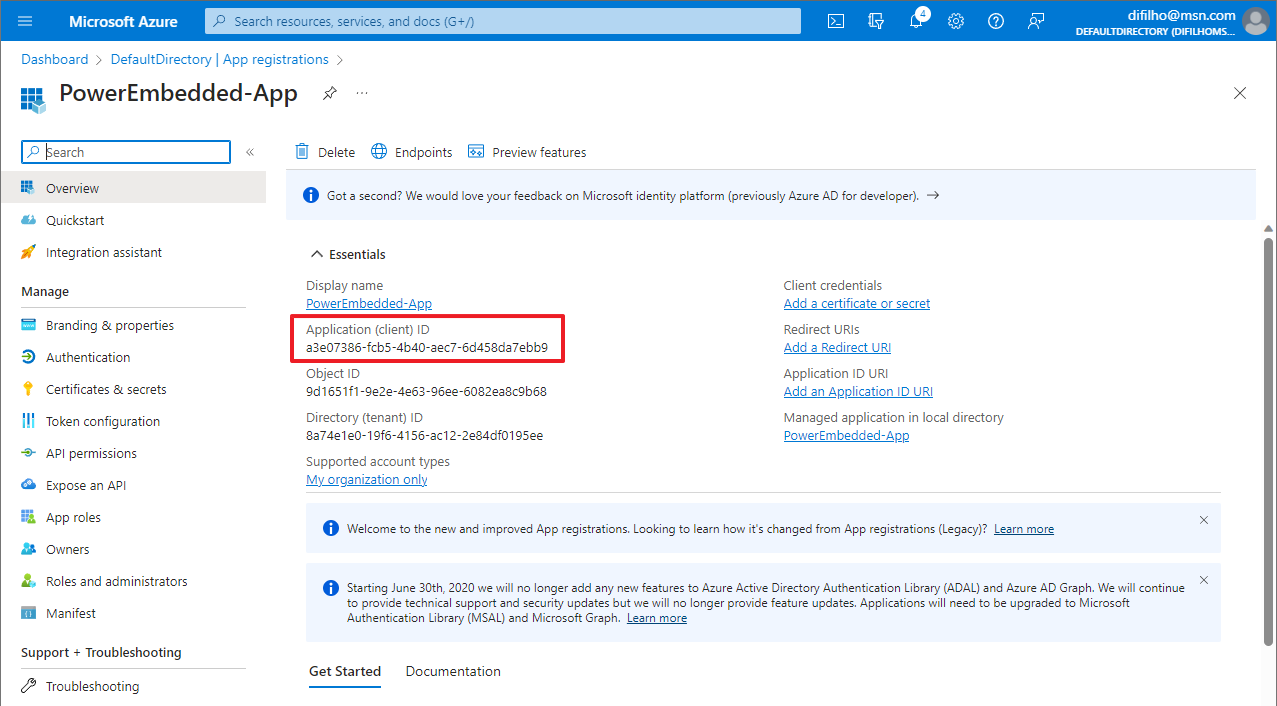
Após a criação desse aplicativo, você será direcionado para a tela de visão geral.
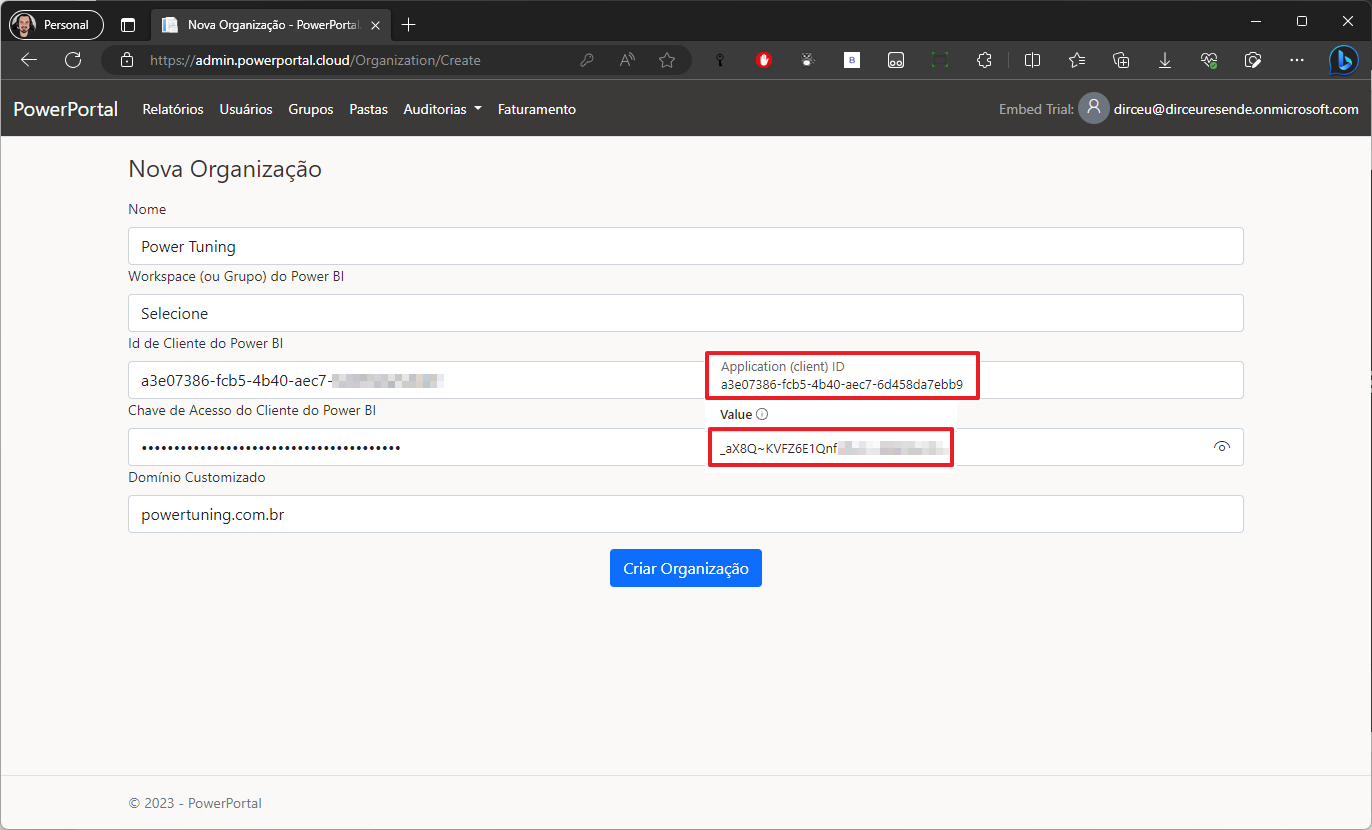
Copy the value from the “Application (client) ID” field and save it in a notepad. This key is what you will paste into the “Power BI Client Id” in the Power Embedded organization configuration.
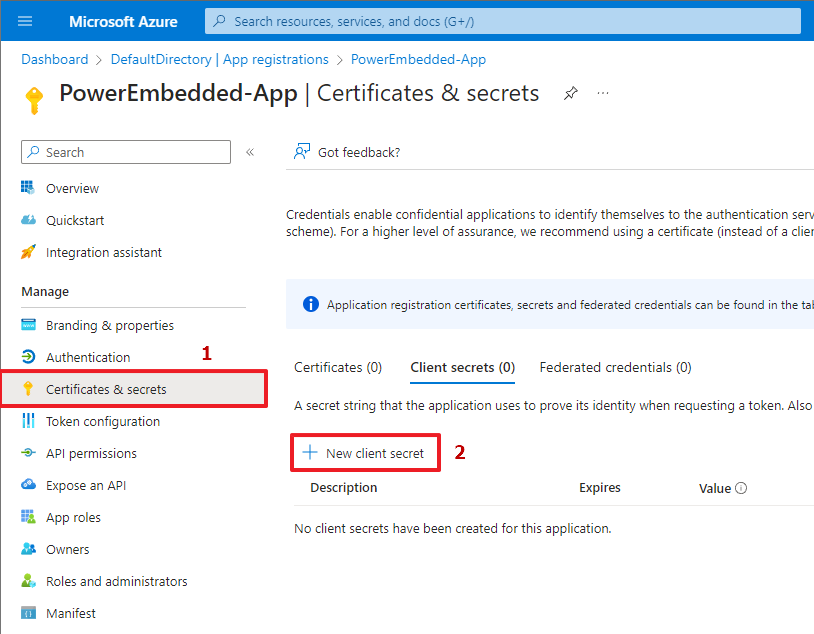
Now click on the “Certificates & secrets” option and then click on the “New client secret” button
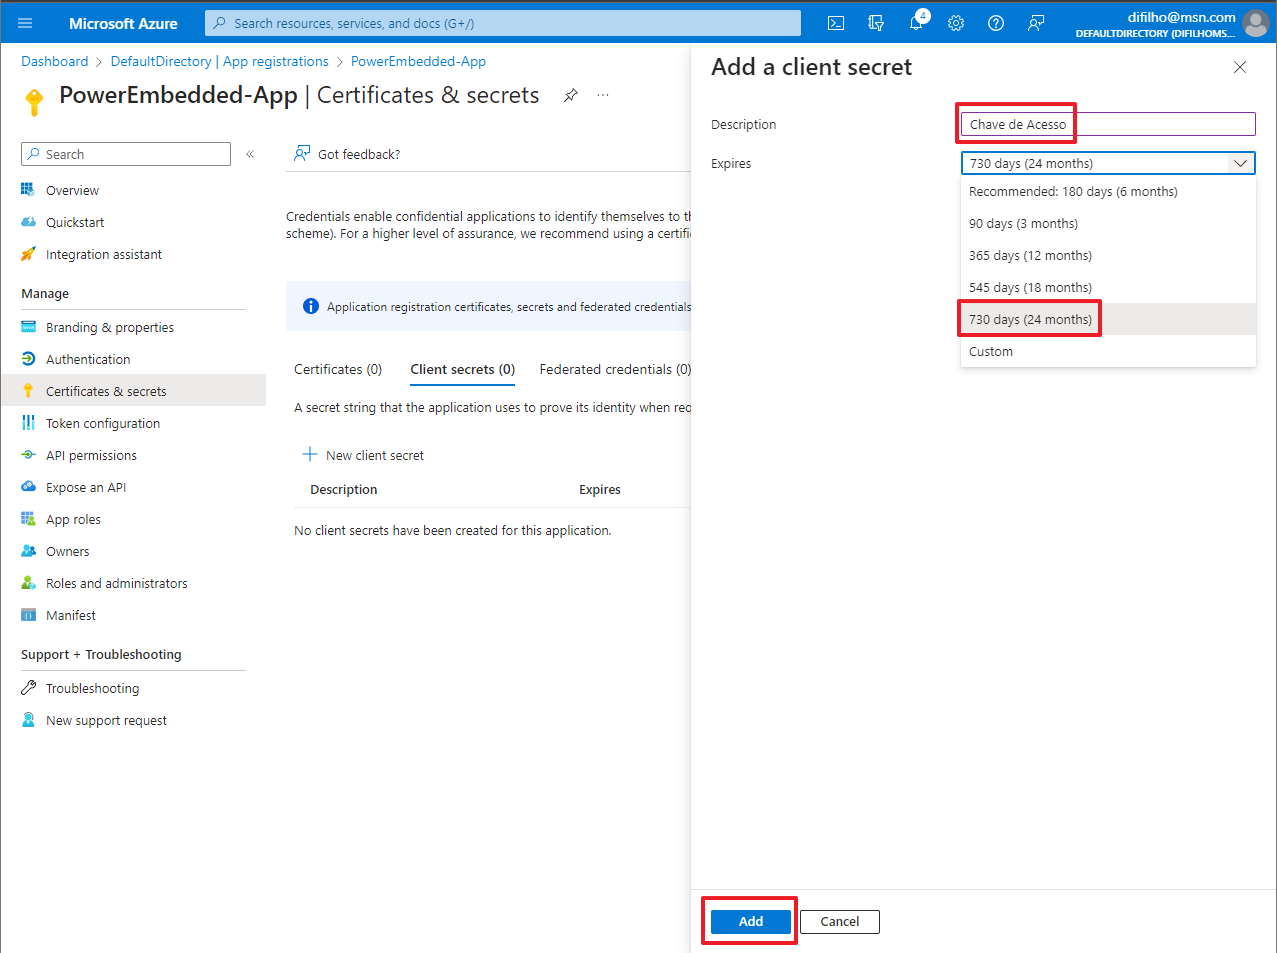
In the new screen that opens, enter a description for this secret (as per your preference) and select the validity of this secret.
I suggest choosing 24 months so that you only need to worry about this expiration after 2 years (Yes, after the chosen period, this secret will expire and the system will STOP working. You will need to generate a new secret and update it in Power Embedded).
Now click on the “Add” button at the bottom of the page.
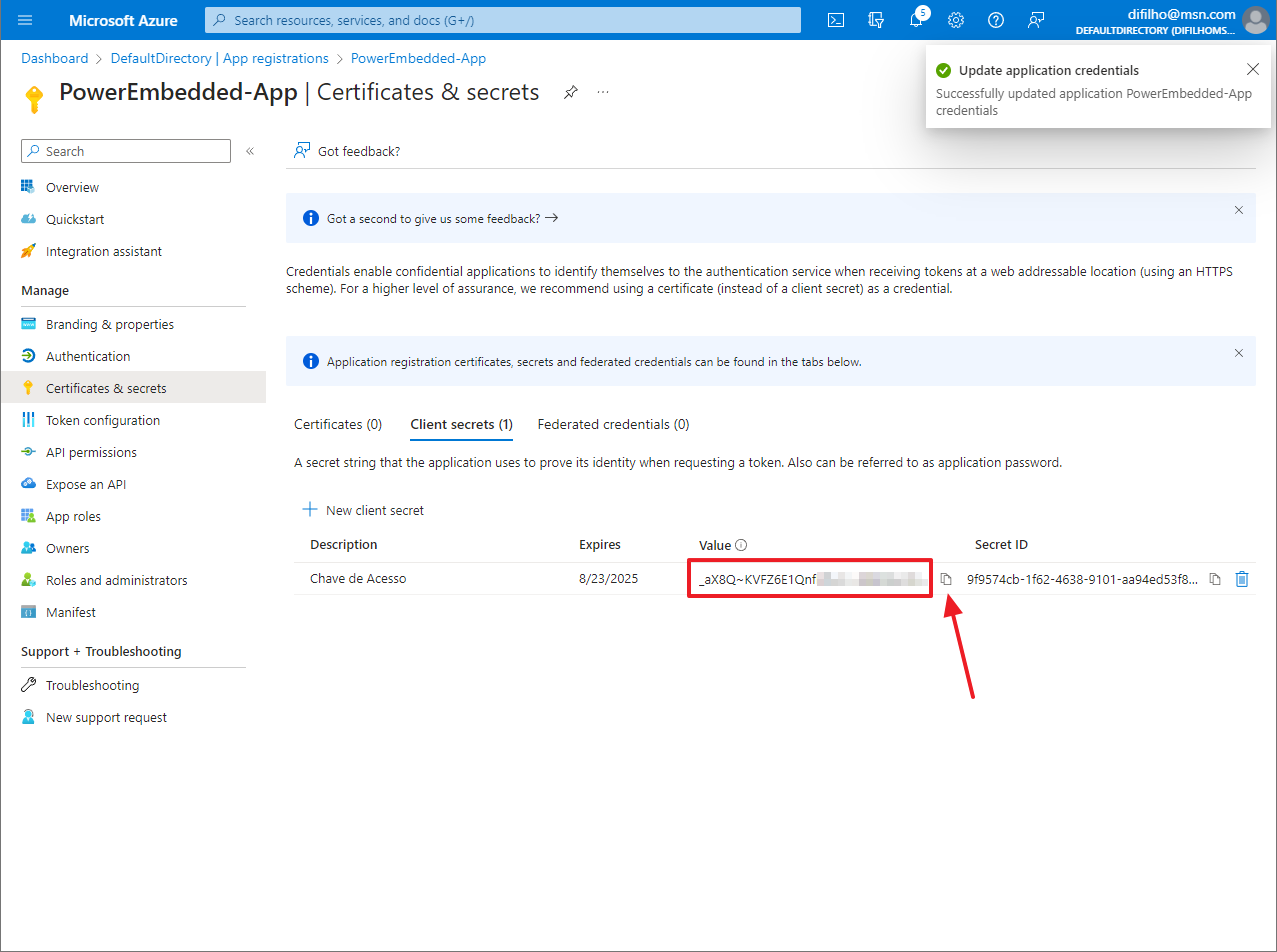
Now copy the generated “Value” field. There is a copy button next to this key.
Write down and keep this key safe, as this will be the ONLY time you will be able to see it. If you lose this key, it will not be possible to recover it: You will need to generate a new secret and update it in the system.
This value that I highlighted and you copied, you must paste into the field “Power BI Client Secret” on the Power Embedded configuration screen.
Sync Azure AD users and groups (Entra ID)
To integrate Power Embedded with Azure AD (Entra ID) and import users and groups.
On the same application registration screen, click on “API permissions” and then “Add a Permission”.

On the next screen select the “Microsoft Graph” option.
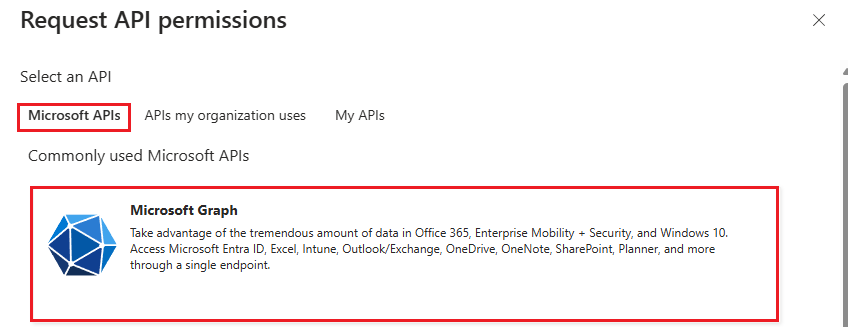
Then select the “Application permissions” option.

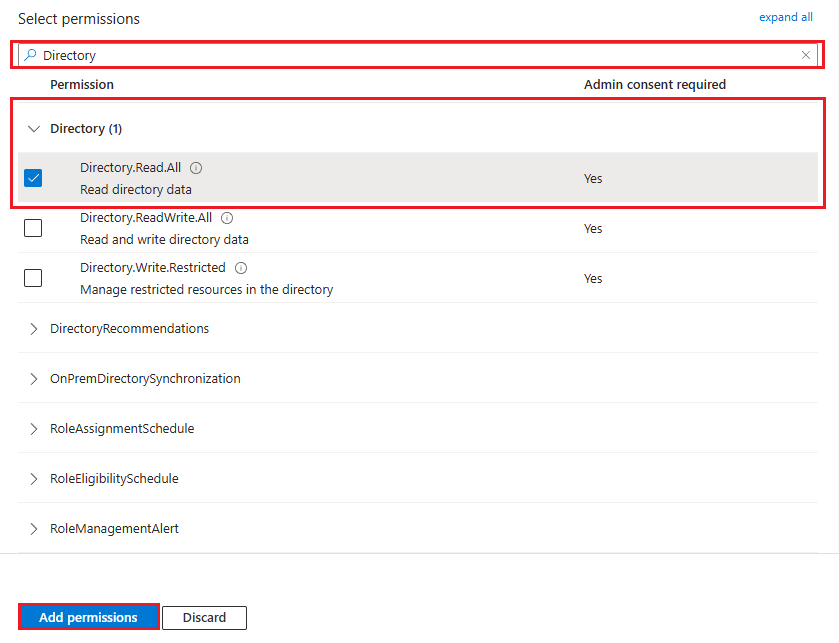
In the next tab, search for “Directory” and select the first option “Directory.Read.All” and click “Add permissions”.
To finish, simply grant administrator consent by clicking on “Grant admin consent for”.
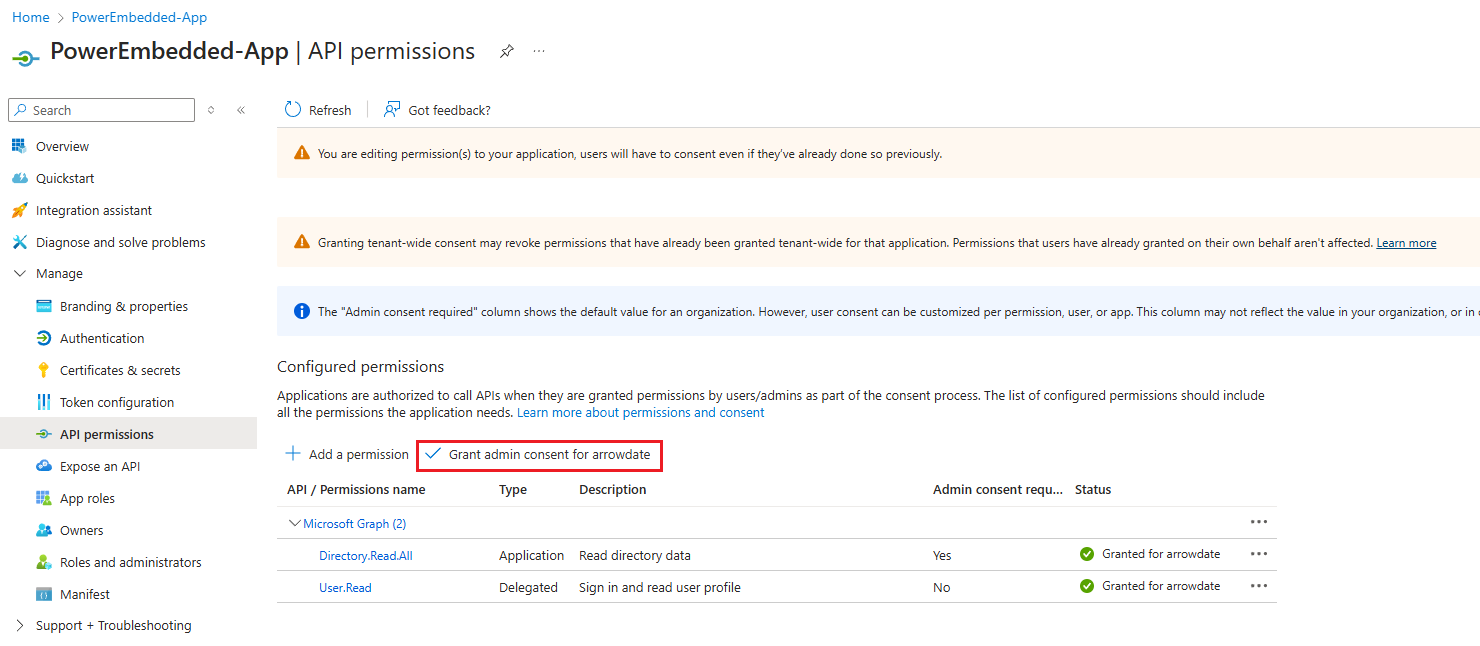
Done, when you complete the next steps you will be able to import users and groups from Azure AD (Entra ID) to Power Embedded.
Adding Power Embedded user to a new AD group
To grant permissions in the Power BI Admin Portal to the Service Principal you just created, it must be part of an Azure AD security group (Entra ID).
To do this, go to this link here and click on the “New group” button.
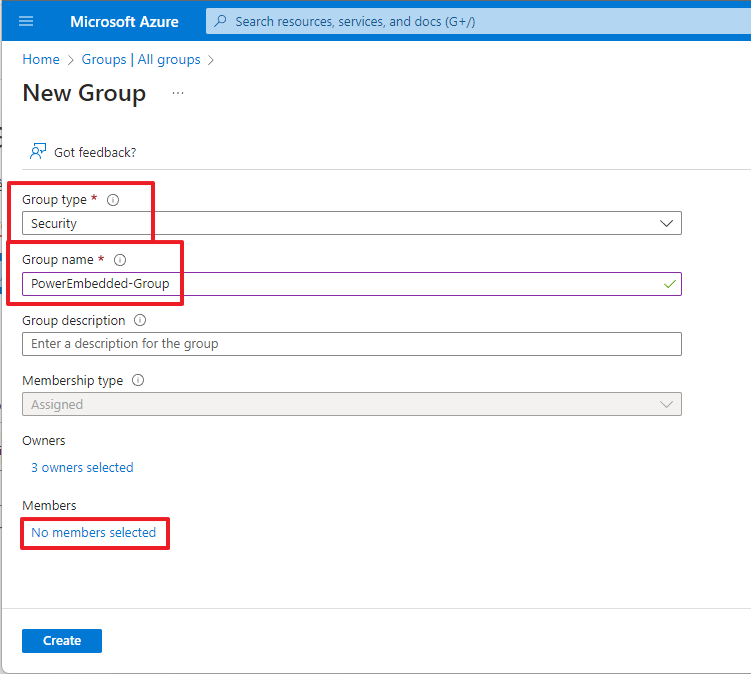
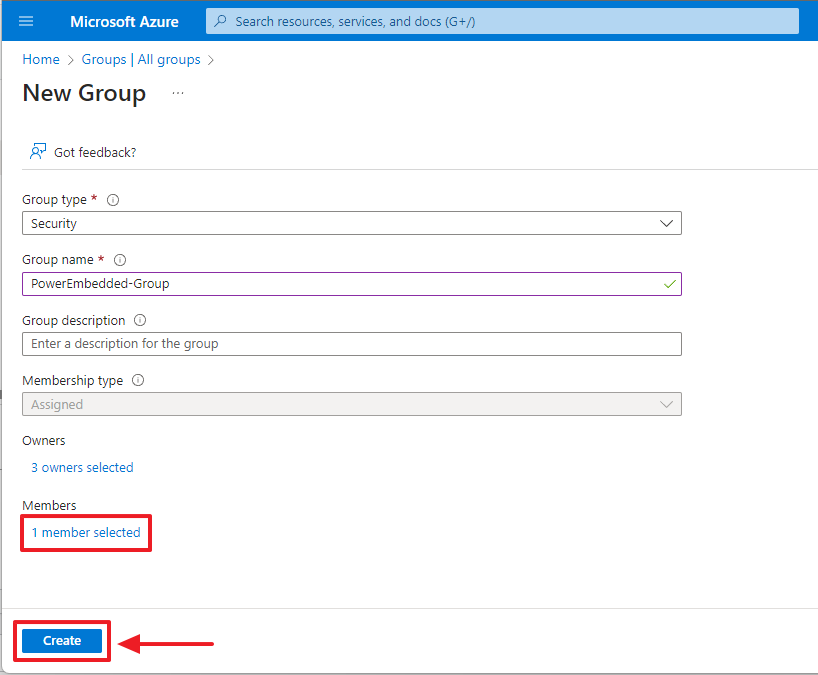
Select the “Security” option in the “Group type” field and enter a name of your choice for the group we are creating.
Click on the “Owners” link and add the people who will be responsible for Power Embedded.
Click on the “No members selected” link in the “Members” category
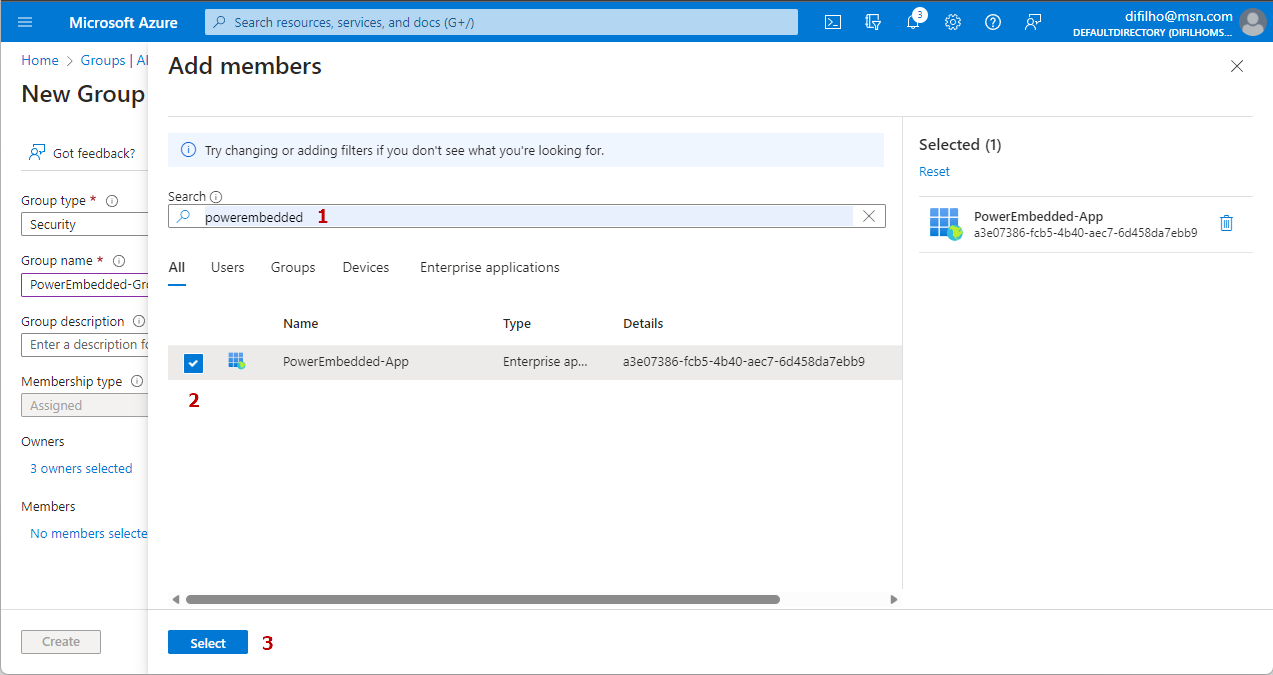
In the screen that opens, enter the name of the Service Principal you created to filter. Select the Service Principal from the list and click the “Select” button at the bottom of the page.
Now that you have selected the member to add to this new group, click the “Create” button at the bottom of the page.
Como criar a capacidade do Power BI Embedded
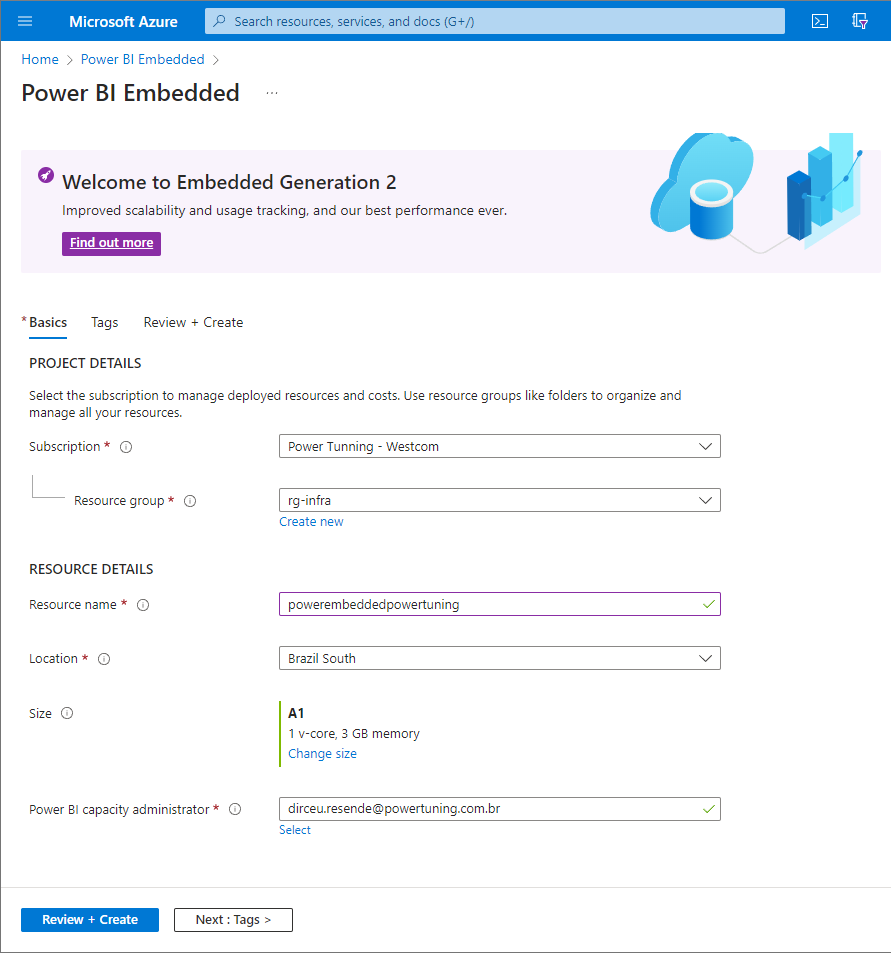
Para criar a capacidade do Power BI Embedded, utilize this link here.
Selecione a sua assinatura, o grupo de recursos que irá utilizar, dê um nome para a sua capacidade do Embedded (lembrando que o nome precisa ser único para toda a região selecionada) e selecione a região onde o recurso será criado.
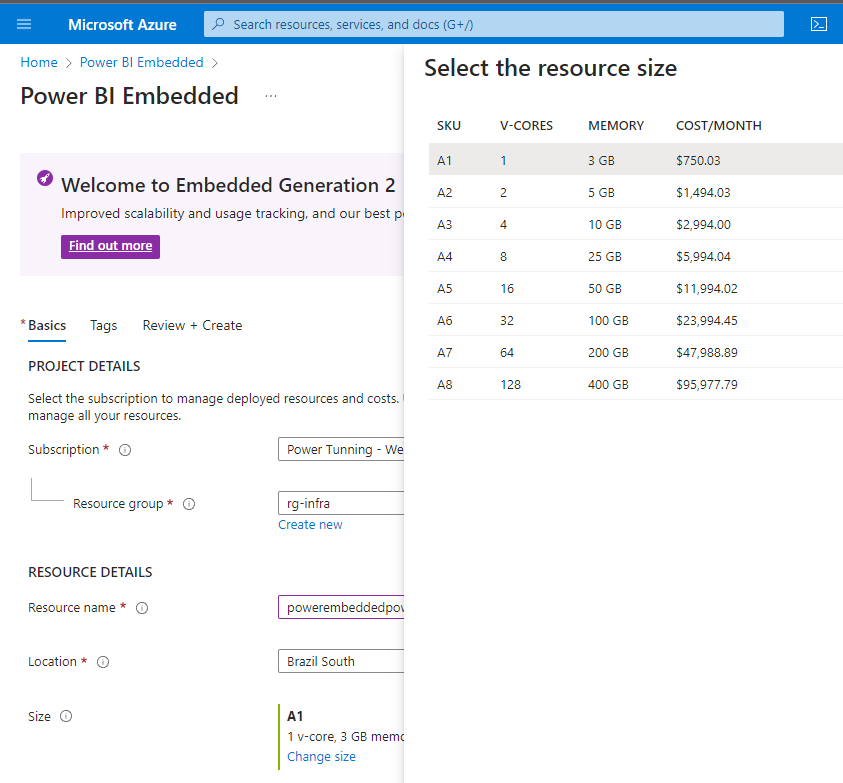
Lembre-se de especificar o tamanho da capacidade que irá criar e clique no botão “Review + Create” e depois no botão “Create”, no final da página.
Para o recurso de otimização de capacidade funcionar corretamente, você precisa adicionar as permissões necessárias na capacidade para o usuário/grupo do Power Embedded.
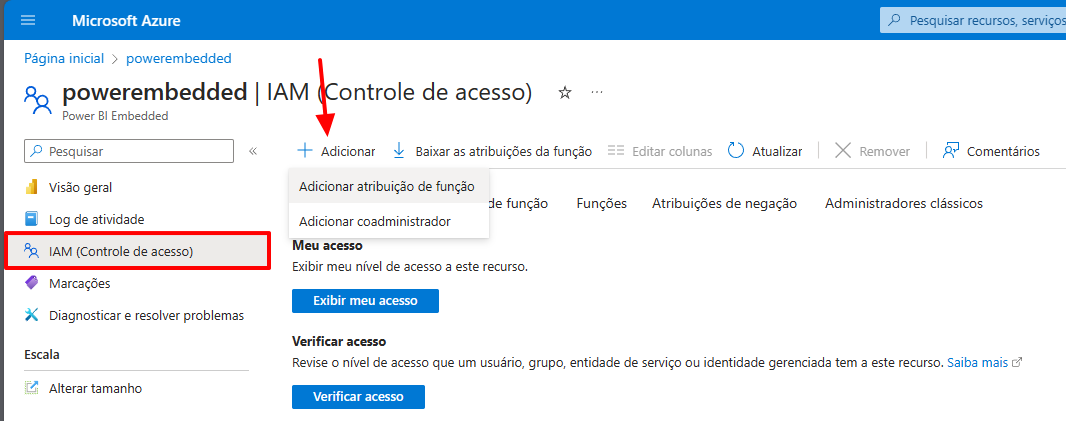
Acesse a sua capacidade Embedded ou Fabric no portal do Azure, seleciona o item “IAM (Controle de acesso)” no menu esquerdo, depois clique no botão “Adicionar” -> “Adicionar atribuição de função”
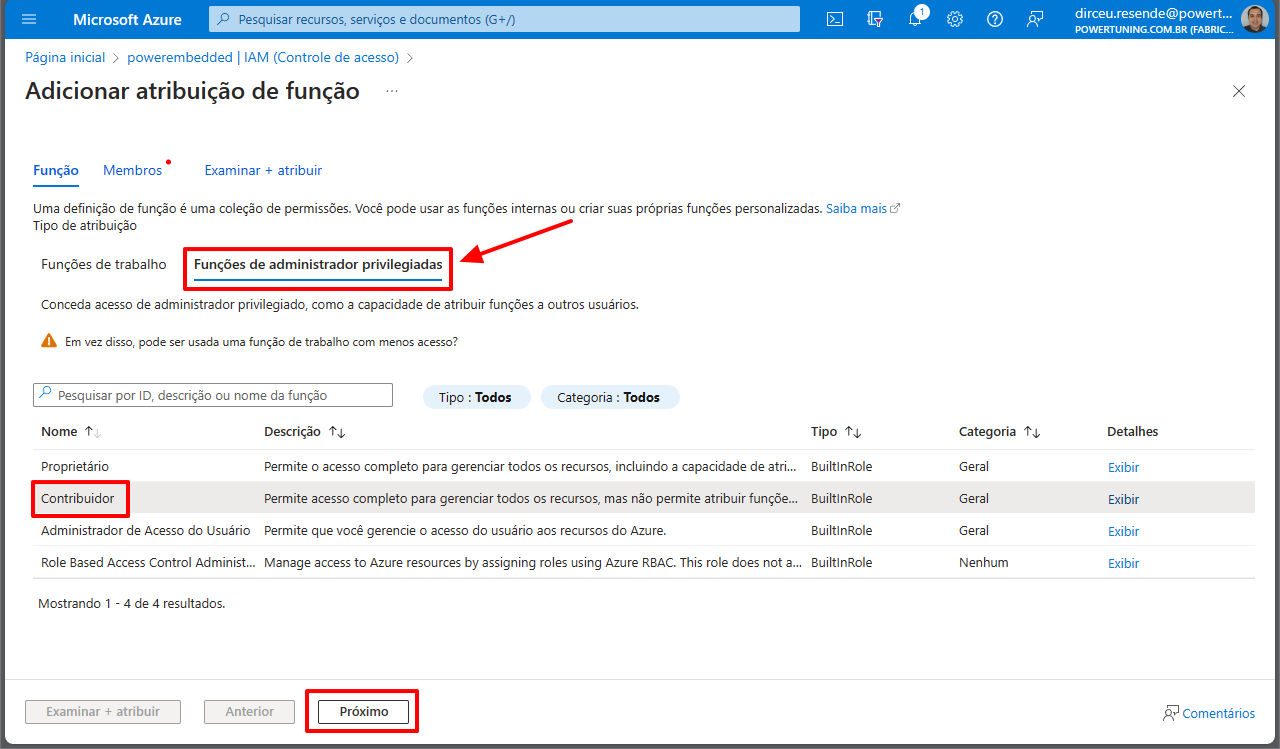
Clique na aba “Funções de administrador privilegiadas”, marque a função “Contribuidor” e depois clique no botão “Próximo”
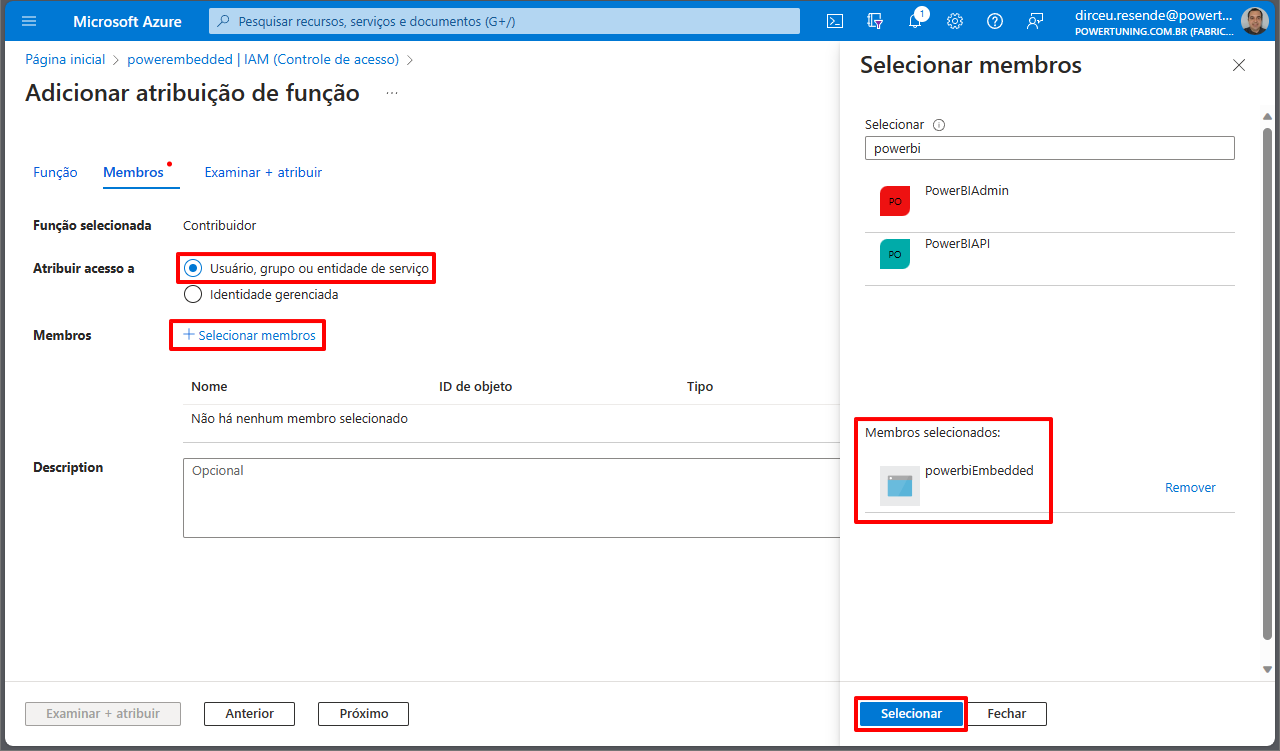
Marque a opção “Usuário, grupo ou entidade de serviço”, clique no link “+ Selecionar membros”, localize e selecione o usuário ou grupo do Power BI Embedded que você criou e clique no botão “Selecionar”
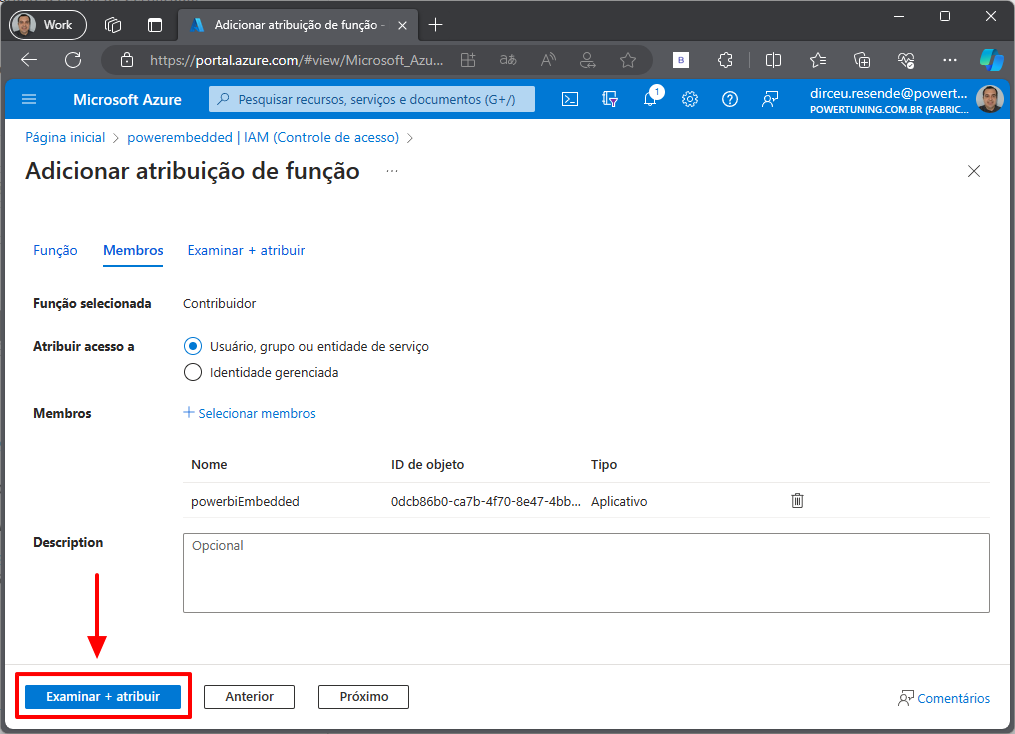
Clique no botão “Examinar + atribuir” e na próxima tela de resumo da operação, clique nesse botão novamente.
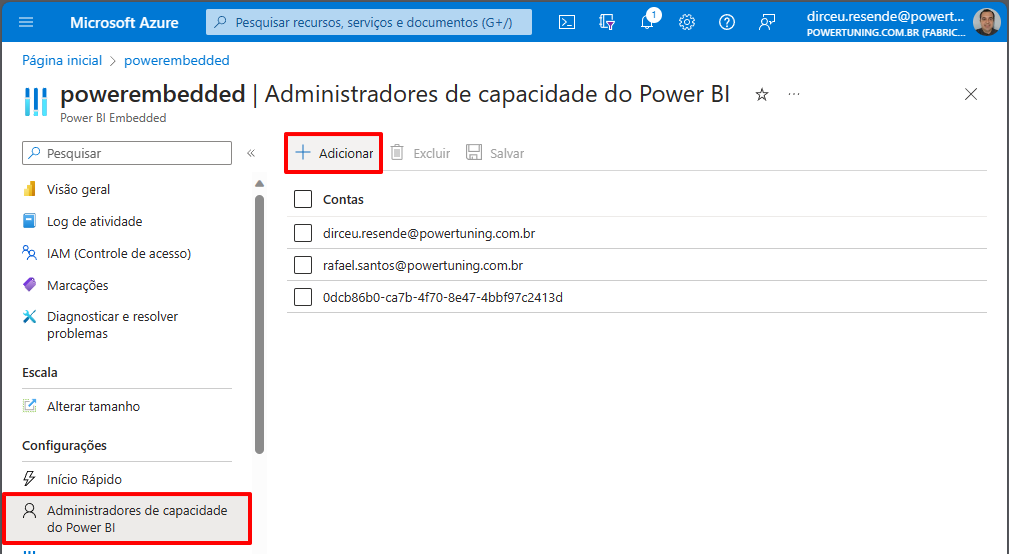
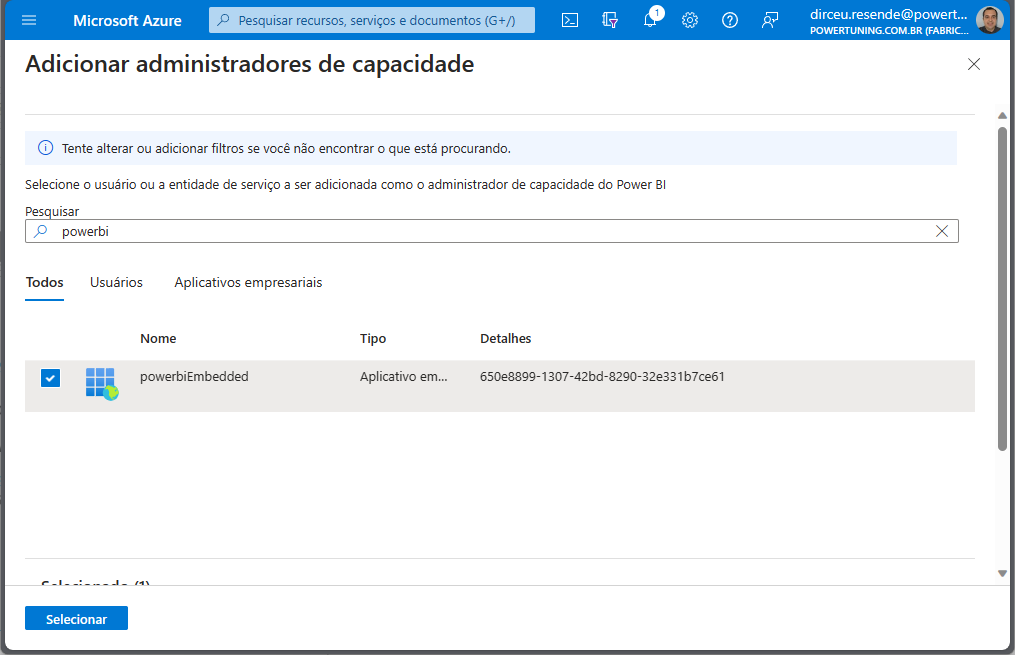
Agora vamos adicionar o usuário do Power Embedded como administrador da capacidade.
Para isso, clique no item “Administradores de capacidade do Power BI” no menu da esquerda
Localize e selecione o usuário que você criou para o Power Embedded e depois, clique no botão “Selecionar”
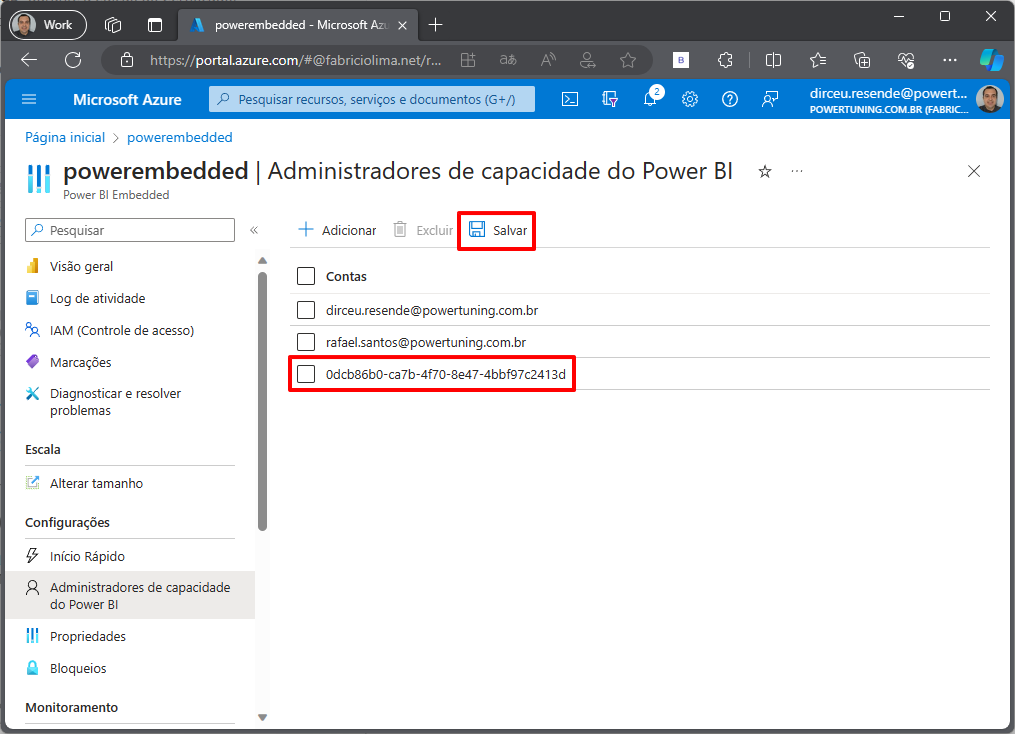
Um novo registro contendo o ID do objeto do service principal do Power Embedded irá aparecer na lista dos administradores da capacidade.
Não se esqueça de clicar no botão “Salvar” para confirmar a alteração.
How to release the necessary permissions in the Power BI Admin Portal
Using a user with Power BI administrator permission, access this link here.
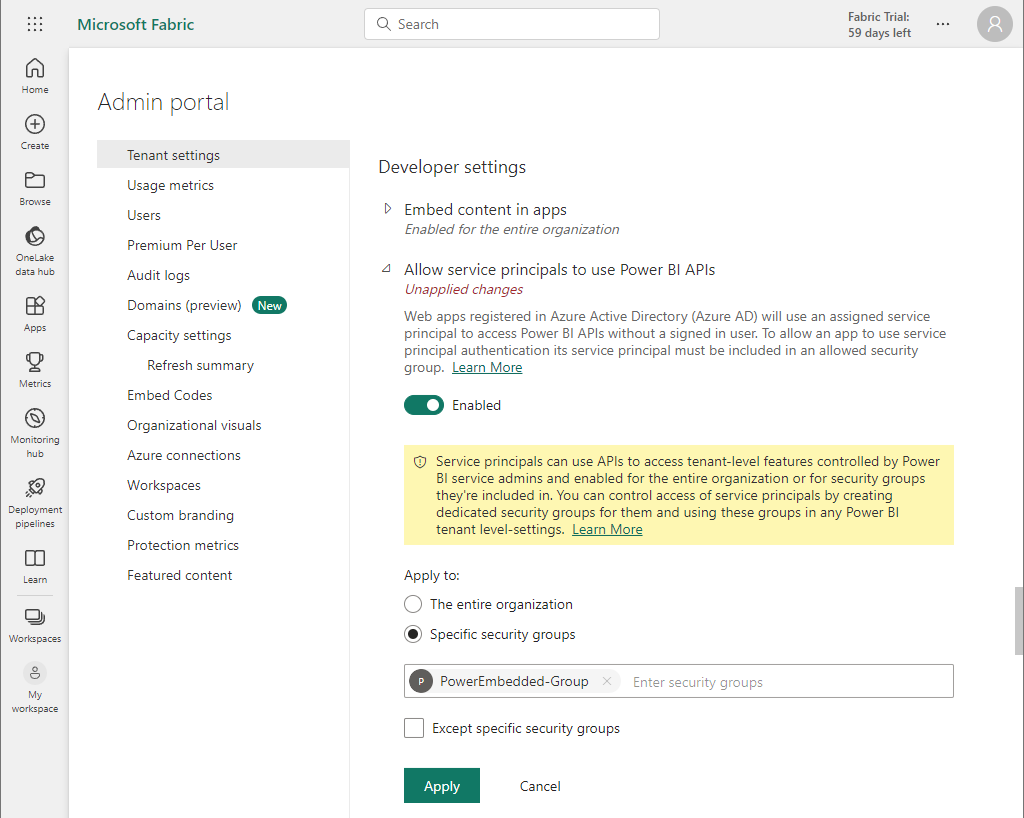
Desça a página até encontrar a seção “Developer settings” (ou aperte Ctrl+F e busque por “api”)
Marque a opção “Allow service principals to use Power BI APIs”.
Por questões de segurança, marque a opção “Specific security groups” na seção “Apply to:” e selecione o grupo de segurança que criamos no começo deste tópico (no meu caso, “PowerEmbedded-Group”)
Clique no botão “Apply”.
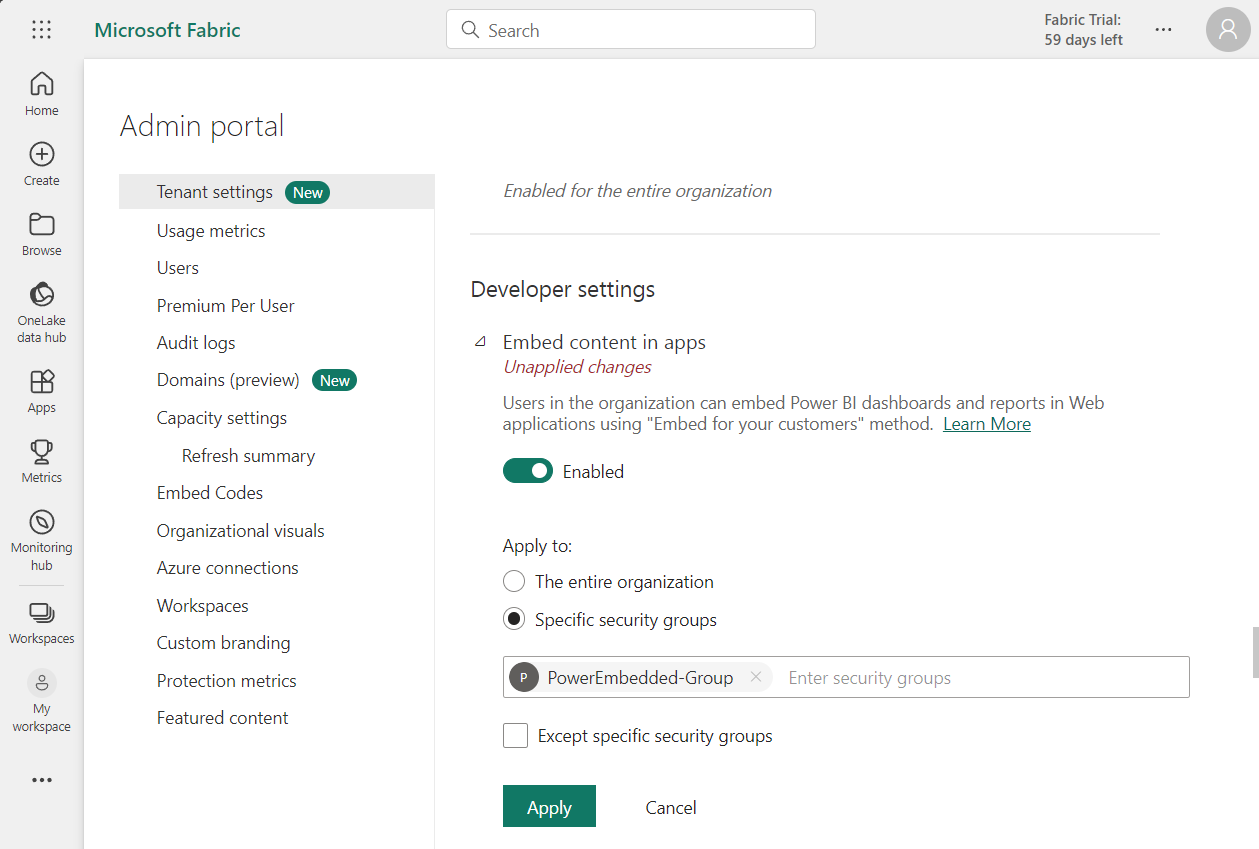
Ainda na categoria “Developer settings”, marque a opção “Embed content in apps” e adicione o grupo de segurança que você criou no filtro “Specific security groups”, na opção “Apply to”.
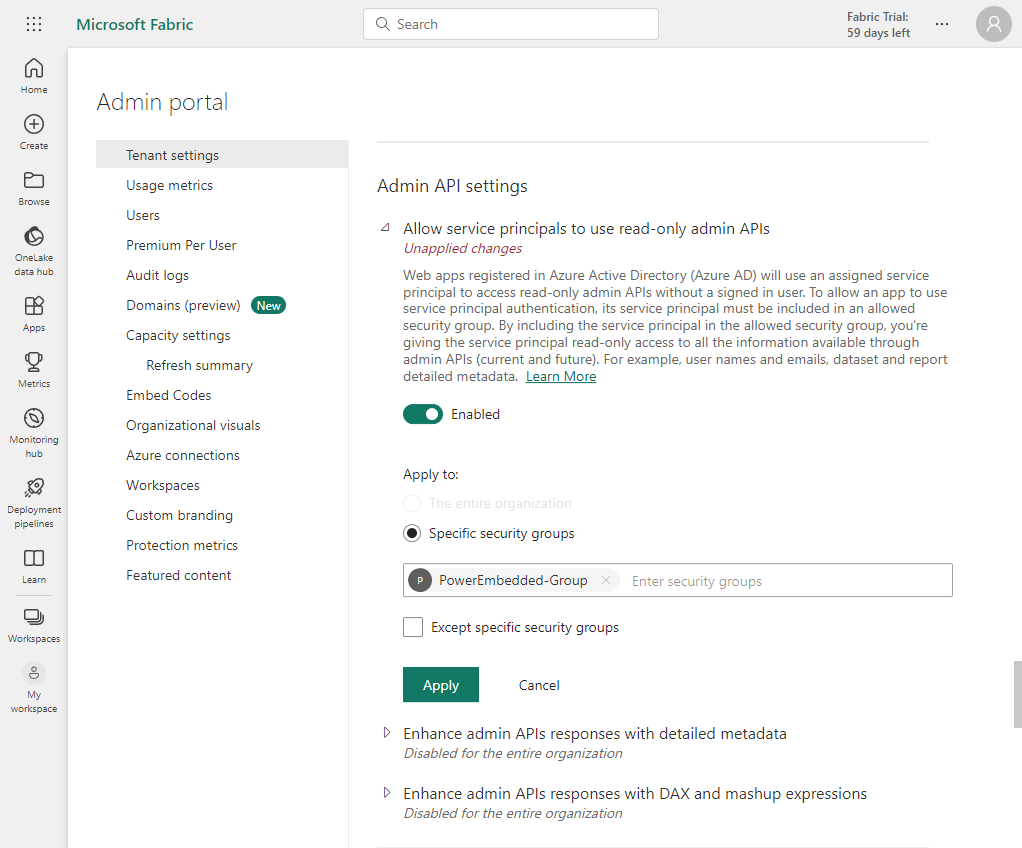
Desça mais um pouco a página e repita o mesmo processo para o item “Allow service principals to use read-only admin APIs”, na seção “Admin API Settings”.
Done! Now the Portal has access to your Power BI environment.
First access to the Administrative Portal
Access the administrative area of the Portal by accessing this link here, logado com um usuário com permissão de “Administrador Global do Azure”.
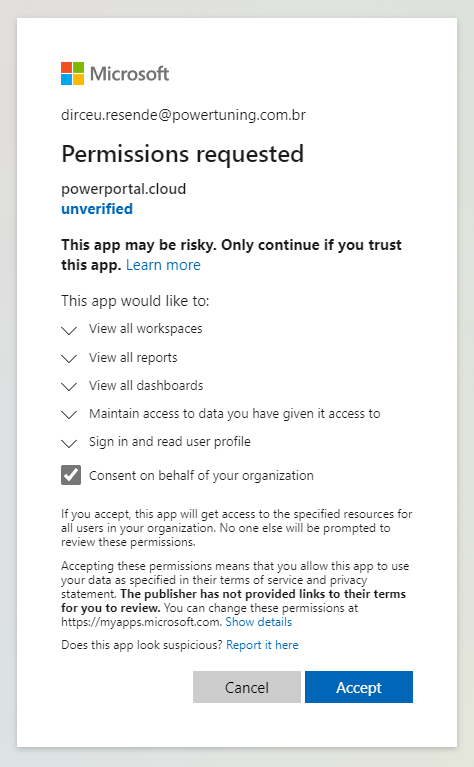
You will authenticate with your Microsoft account and once you finish logging in, you will see a permission request screen in your Azure AD.
Check the “Consent on behalf of your organization” option and click the “Accept” button.
Did you forget to check the “Consent on behalf of your organization” option or did you install with a non-administrator account?
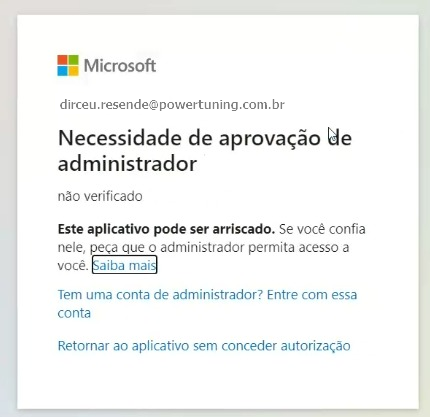
Click here to see how to manually release permissionIf you have accessed the administration portal using a user without the necessary permissions, the screen above may not appear for you, and the screen below may actually appear when you or another user tries to log in to the administration area.
If this happens, you will need to authorize the Power Embedded application (powerportal.cloud) on behalf of the organization, using a user with global permissions in Azure AD.
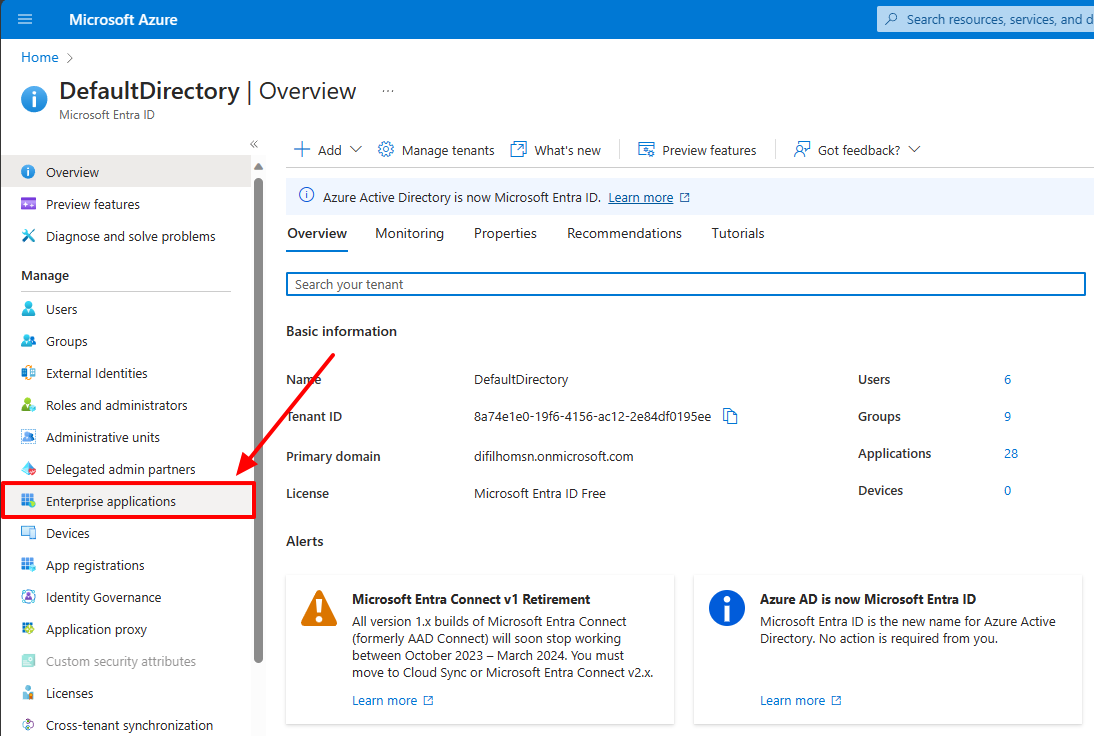
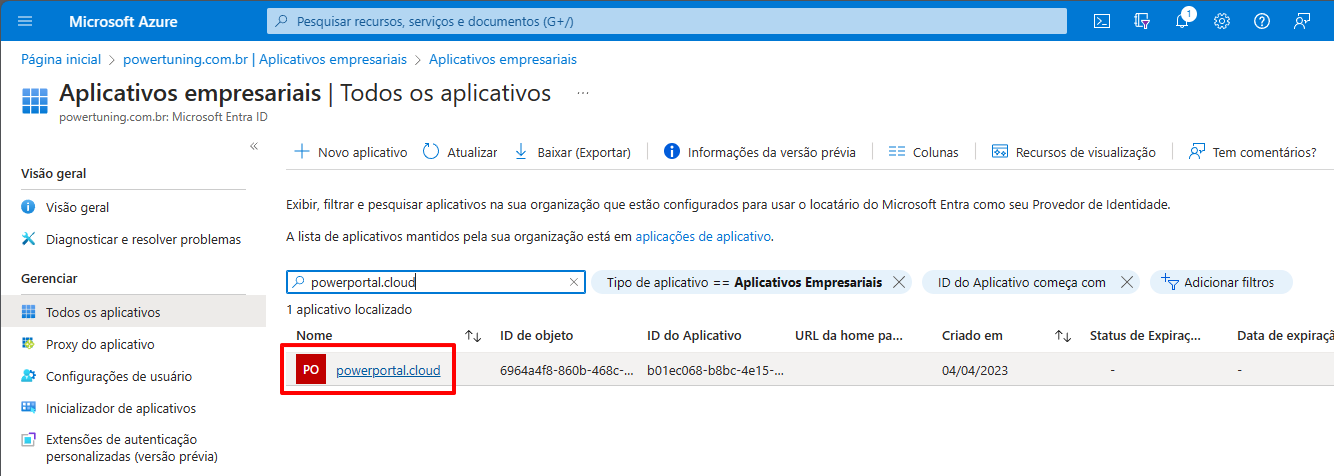
To do this, click on the link “Enterprise Applications” from Azure AD (Entrance ID)
Locate and click on the “powerportal.cloud” application
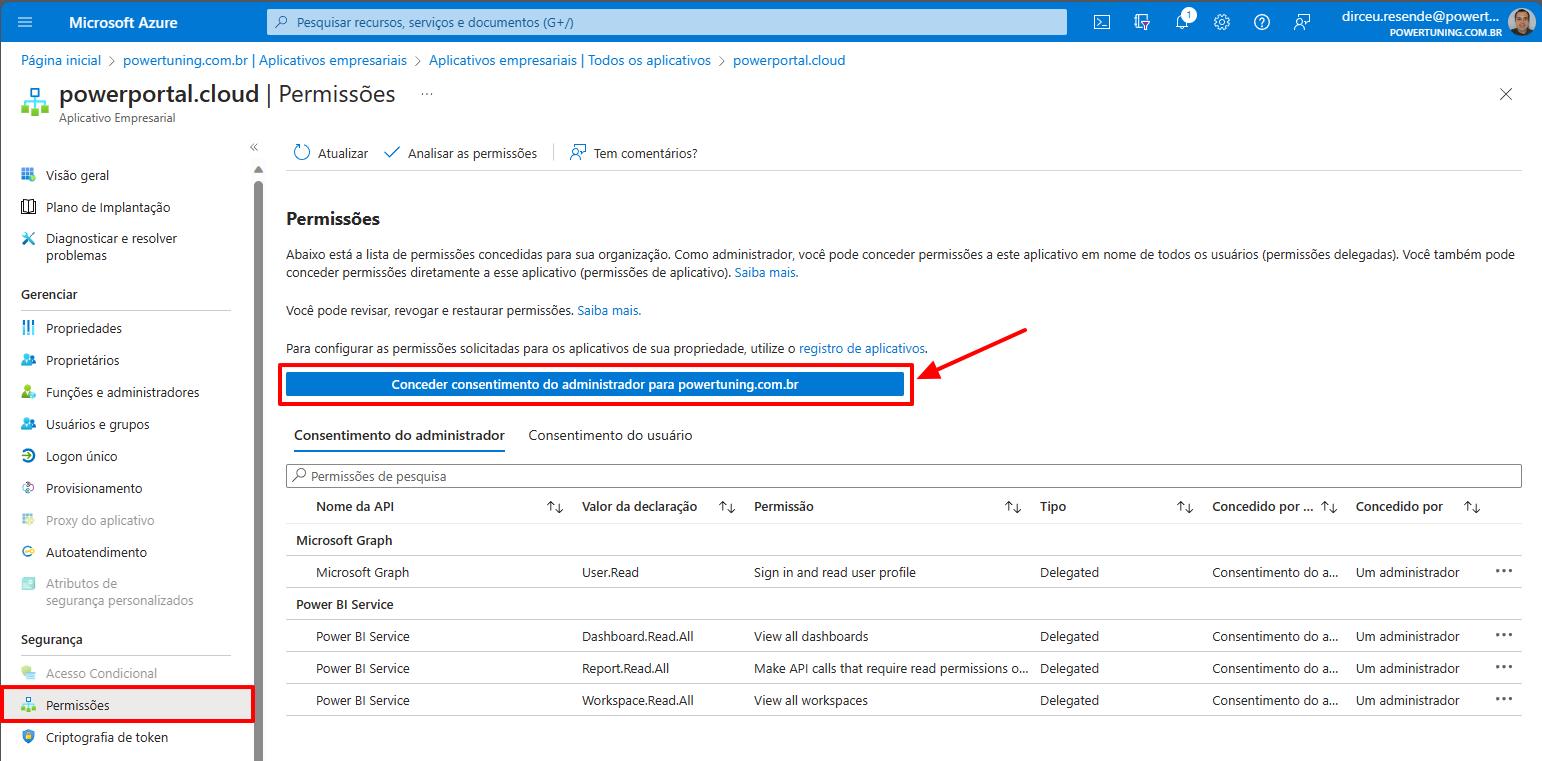
Click on the “Permission” menu in the left panel and then click on the “Grant admin consent for…” button and authorize the application.
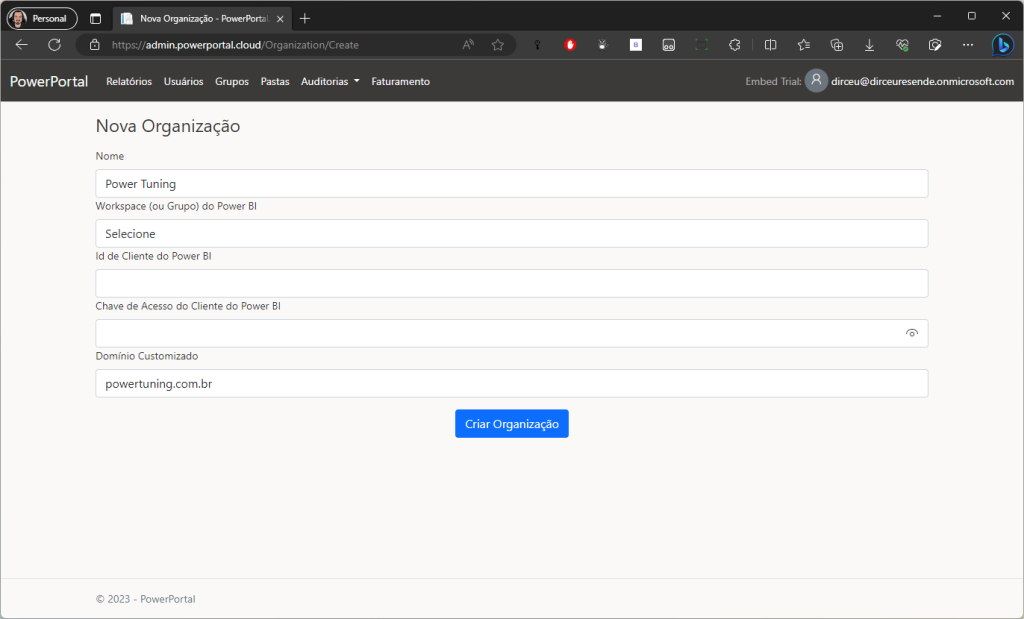
After confirming the permissions, you will be directed to the system and must create the new organization.
On this screen, you can configure the following settings:
- Name: This is the name of your company. The system will retrieve the name registered in the Azure Tenant, but you can change it on this screen or later, through the system settings page.
- Workspace: É o workspace inicial do sistema. Você pode selecionar qualquer workspace nesse momento, pois isso poderá ser alterado posteriormente.
- Power BI Client Id: This is the Service Principal ID that will be created to integrate Power Embedded with your Azure Active Directory (we will explain more about this below).
- Power BI Client Secret: It is the secret generated for the Principal Service (we will explain more about this below).
- Custom Domain: This is your company's domain (without www or https). This field will be used to create a personalized access URL to access reports (e.g. relatorios.suaempresa.com.br)
With the Client ID and Secret Value that you obtained at the beginning of the installation and wrote down in a notepad, we will now use them in the Power Embedded organization configuration screen:
Click on the “Create Organization” button and you can start using the Portal.
How to integrate Portal with Power BI Workspace?
In order to import Power BI reports into Power Embedded, you will need to do two things in the workspace:
- Alterar a capacidade do Workspace para capacidade Premium (Embedded).
- Add the created Service Principal (Power Embedded user) as an administrator of the workspaces you want to import reports (can be more than 1).
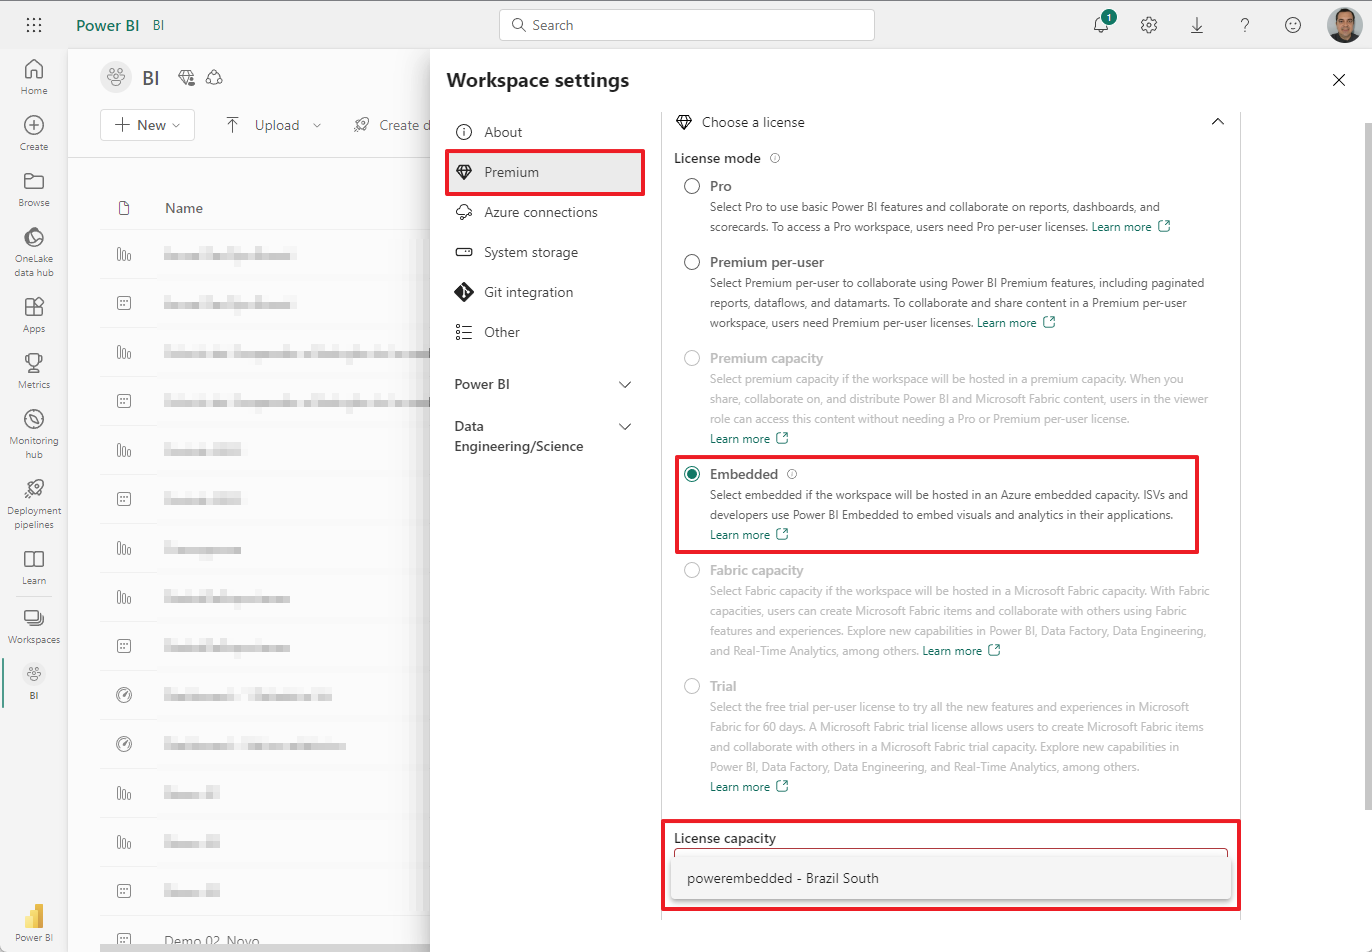
Alterar a capacidade do Workspace para capacidade Premium (Embedded), acesse o workspace, clique nos 3 pontinhos e selecione a opção “Workspace settings”
Na tela que foi aberta, clique no menu “Premium”, depois escolha a licença “Embedded” e no campo “License capacity”, selecione o recurso Embedded que você criou anteriormente na lista.
Clique no botão “Apply”, logo mais abaixo.
A partir desse momento, esse workspace agora está na capacidade Premium e associado ao recurso do Power BI Embedded. Caso você pause esse recurso, o Workspace ficará inacessível, mesmo utilizando uma conta Pro e acessando direto pelo portal.
The last step now is to add the Service Principal user to the Workspace.
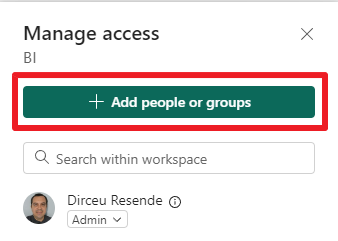
Para adicionar o Service Principal criado como administrador de um workspace, acesse o workspace, clique nos 3 pontinhos e selecione a opção “Manage access”
Clique no botão “+ Add people or groups”.
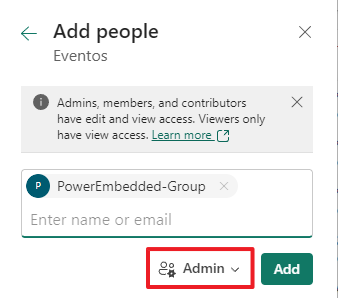
Pesquise pelo nome do grupo que foi criado anteriormente e lembre de alterar o nível de acesso para “Admin”. Após isso, clique no botão “Add”.
Done! Now Power Embedded has access to this workspace. Repeat this for all the Workspaces you want to import reports from.
